At the heart of every start center in Maximo is the result set. This is a user defined query that you can create and save on any object you want from within Maximo. You can create a query to return a list of workorders, assets, locations, etc. Once you have setup a query, you can use it to return lists of data to any portlet for a start center, create a KPI, or use it as a default query for when you go into an application such as Work Order Tracking.
Creating a basic query in Maximo
The first step to creating a saved query is to decide which application you want to retrieve records from. In this example, we will be creating a saved query in the Work Order Tracking application. To create a saved query in this application or any application, we can start off by opening the ‘Advanced Search’ dialog. Here you can decide what you want to search (query) for. Let’s make it simple and let’s say we want to search for all workorders that have a worktype of ‘PM’ and with a status of ‘APPR’ or ‘INPRG’. It should look something like this:
Once you click on ‘Find’, you should now have a list of workorders matching your search criteria. The next step is to save this search criteria as a ‘Saved Query’. To the right of the ‘Advanced Search’ button, there should be another button called ‘Save Query’. Clicking on that will prompt you to save your current search criteria to be used later in a portlet or a default query. Fill in the fields as you see here:
You can specify any name you want, but the two check boxes are also important. The ‘Public?’ check box specifies if you want this query to be used by other users other than you. If you plan on using this query as a portlet for other users to see, then you should check this box. If you only want to save this query for your own personal use, then leave it unchecked. The ‘Default?’ check box specifies whether you want to use this query as your default query every time you open the Work Order Tracking application. Click OK to save your query.
Once you have saved your query, you can view/manage your queries by clicking on the yellow arrow button to the right of the ‘Save Query’ button and clicking on ‘View/Manage Queries’. You should now see your saved query that you just created. You can modify your settings at any time and you can also modify the SQL query but clicking on the blue arrow on the left to expand it. If you aren’t familiar with SQL programming, I would recommend not modifying it manually as you could crash your system if you aren’t careful.
So now you have a saved query you can use for portlets in your start center. I have already created a portlet example here.
Creating advanced SQL queries
If you are familiar with SQL, then you can continue reading this section as there are many ways to create advanced queries to find records in Maximo. First, instead of using the ‘Advanced Search’ button, we can click on the yellow arrow to expand the list so we can click on ‘Where Clause’. This gives advanced users the ability to modify the where clause of the current query. If you click on it now, you can see the SQL for the advanced search we did above.
You can see that Maximo added some extra search criteria to our search. One of the first options for using SQL directly is the ability to create dynamic saved queries. We can insert the :USER value anywhere we want to use the current logged in users name as substitute variable. This means that we can modify our query to search for all PM’s that have a status of ‘APPR’ or ‘INPRG’ and also assigned to the currently logged in user. We can modify our query to look like this:
((woclass = 'WORKORDER' or woclass = 'ACTIVITY') and (status = 'APPR' or status = 'INPRG') and historyflag = 0 and siteid = 'B&G' and istask = 0 and worktype = 'PM' and lead = :USER)
Now this is assuming you are using the LEAD field to assign work to users, but you get the idea.
The next thing we can do with SQL is to do table joins. SQL joins in Maximo are tricking because we only have access to the where clause and not the from clause, so we have to work our way around it. Here is an example of joining the work order, phone, and email tables.
where (select count(*) from dbo.phone ph where :personid = ph.personid and ph.isprimary=1) > 0 and (select count(*) from dbo.email e where :personid = e.personid and e.isprimary=1) > 0
As you can see, there are other dynamic variables that you can use as well. In this case, we are using :PERSONID as a dynamic variable.
Using saved queries
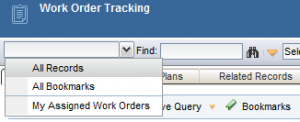
Now that you have setup your queries, the next step is to use these for our result sets in our start center either as a list or as a KPI chart which we will cover in the next post. In the meantime, you can use your saved queries now in Maximo. Whatever application you created your saved query in, there is a dropdown box at the top left of every application.
If you click on that, you can see a complete list of saved queries that you have made public or private ones that you have created for yourself. You can quickly view different list of records just by using this dropdown list.


