With the release of Maximo 7.5, a lot of companies are beginning to wonder what their first steps should be to prepare for their eventual upgrade:
- Do I order a new development server, so I can test the new software?
- Do I send my administrator to Maximo 7.5 training?
- Do investigate what updates I need to make to keep my ERP integration working?
The list can go on and on. While there are a lot of ‘under the hood’ changes to Maximo 7.5 an upgrade plan will need to address, the basic steps of creating a work order, adding an asset, or searching for a purchase order are the same… until you see the screen. If you have spent any time on IBM’s Maximo 7.5 Preview Site [link] or seen a demonstration of Maximo 7.5, the first thing you will notice is Maximo 7.5 does not look like Maximo 6.x or Maximo 7.1.x. In fact it looks quite different from the previous releases.
The biggest headache any upgrade can bring is getting their casual users accustomed to something that looks different – it’s called ‘new button icon’ syndrome. Ok, it really isn’t, but when the application functionality and steps to move around are the same, if the navigation buttons look different, some of your Maximo users may not be comfortable with the upgrade. Here’s how you can prepare your Maximo users to the new user interface without a single download.
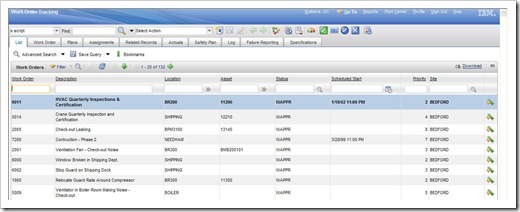
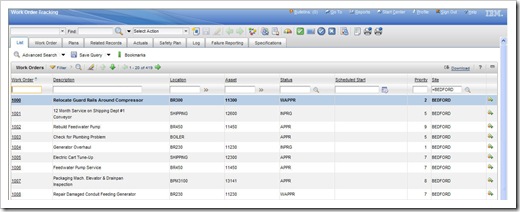
As of Maximo 7.1.1.5, there was an option to enable an alternate appearance, or skin, to the Maximo application. This alternate skin, called ‘tivoli09’, in Maximo 7.1.x has the same appearance as Maximo 7.5. See below:
Screenshot of Maximo 7.5 WO Track app:
Screenshot of Maximo 7.1.1.6 WO Track app with Tivoli09 skin enabled:
Except for the new ‘Assignment’ tab that is available in Maximo 7.5, the screens are essentially identical. Here’s the steps to get the ‘Tivoli09’ skin enabled in your Maximo 7.1.1.5, or later, environment.
- Log into the Admin Console or locally to your Maximo server.
- Navigate to the maximo_home\applications\maximo\properties folder
e.g. d:\ibm\smp\maximo\applications\maximo\properties. - Using your favorite text editor, open the webclient.properties file.
- Go to the bottom of the file and remove the # indicator from the following entry:#webclient.skin=tivoli09
- Save the changes and close the file.
- Rebuild and redeploy a new EAR file.
- Restart your application server and log in.
Your users can now get accustomed to the ‘Maximo 7.5’ feel, while still doing their work on your existing Maximo 7.1.x environment. Once the decision is made to move from Maximo 7.1.x to 7.5, the resistance to change will be significantly less because your users will not be dealing with ‘new button icon’ syndrome.


After installing Maximo 7.5.0 and applying 7.5.0.6, I find that the webclient.properties file does not exist in the [SMP]maximoapplicationsmaximoproperties folder; I didn’t go looking for it elsewhere.